Why Detention Control Systems Design Is Easier With the MTI Design Suite
As a company that is dedicated to the needs of our customers and focused on direct sales to detention facilities, we hear a great deal from facility maintenance and administrative staff about their expectations of their detention control systems. One of those expectations relates to the ease with which they can modify their system design. There are times when a previously uncontrolled door needs to be added the control system or when labels for a door or intercom need to be changed. With some systems, this can be a daunting task that requires substantial training, if not certification with one or two independent software applications. But, with the MTI ProDesign suite, designing and modifying the behavior of detention control systems is quite simple. In this article, I'd like to explain why that is.
A Drag-And-Drop Environment for Detention Control Systems
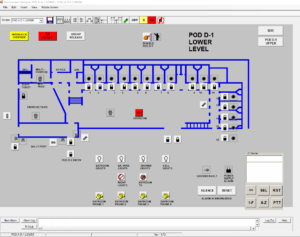
As you can see in Figure 01, the ProDesign environment is a WYSIWYG (What You See Is What You Get) design environment, meaning that if you design a control screen within ProDesign, when you implement that screen on the control station, it will look exactly like what you have designed. In addition to this, ProDesign is a drag-and-drop design platform. This means that you can choose from one of the prescribed device types and click on the screen in the location to which you want this device to be added, and the button will appear. From there, you can hold down your left mouse button and drag the button to a different location, or using the anchor points, you can resize the button.
Simplified Action Assignment
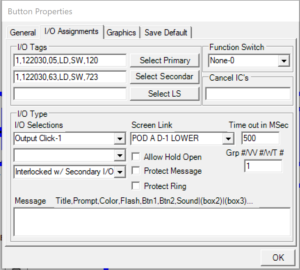
Another design task that ProDesign greatly simplifies is the assignment of an input or output action for a specific on-screen device. The designer can access the properties of any of the devices on a screen by right-clicking or double-clicking on that device icon or button. This will display a Properties page with many options, but there are some notable options that make life much simpler. Notice, first, in Figure 02, the "I/O Tags" section. This section allows the designer to set up to three different I/O points (located on a PLC within the system) from which this point receives indication (input) and provides action (output). The designer can also use the "Function Switch" section to designate this button as one providing a special function, such as for setting prop or breach alarms, group release or protect.Also notice in Figure 02 the section labeled "I/O Type". This section allows the designer to prescribe up to three different Input or Output types for this button. As shown in the image, this button is defined as an "Output Click", which means that an output will be sent to the PLC when this button is clicked. But, there are a number of other potential behaviors that can be defined from these three fields, such as "Dual Output Click" (for activating two outputs at the same time) or "Output with Message" (for displaying a message and waiting on positive response before activating the point).
Full Graphical Control

The final feature that I want to highlight is the ease with which ProDesign allows the designer to fully control the graphics of the detention control systems he or she designs. The screen background can be any bitmap or jpeg formatted file, allowing the designer to export a drawing from an AutoCAD file, or draw it in some graphics application. All of the icons available to the designer are located under the "C:\MTI\Icons" folder, which is installed with the application. Additional icons can be added by the designer by creating them in an icon editing application and then copying the new icon files to the "C:\MTI\Icons" directory. Even sounds used by the system for alarms and notifications can be created in a very similar way.Figure 03 shows the "Graphics" tab of the button properties dialog box. This tab allows the designer to assign the "on" and "off" icons to be used for an I/O point on the screen. It also allows the designer to select the text, background, interlock, and protect colors. In addition to these graphics properties, the designer can also assign the font to be used for the text of any on-screen device from the General tab of the properties dialog box.
Conclusion
If you have ever dealt with the Human-Machine-Interface design suites that are used to design detention control systems, you know that the task of manipulating graphics and assigning I/O addresses for an on-screen device can be much more difficult than what I've explained here. For most of these applications, the designer is required to understand software programming to provide the "If-Then-Else" statement that defines the behavior of a particular point. But, with ProDesign, all of that is taken care of for you, so all you have to worry about is designing the layout of your system.The ProDesign application is part of the ProVision Detention Control System, which includes many other features that are just as simple and customer-friendly.